This post was originally published in 2010
The tips and techniques explained may be outdated.
If you’re confident with your CSS and HTML, it’s not hard at all to step up to the challenge of building a custom WordPress theme. This overview shows the process of how my latest custom WordPress theme was built from design concept through to completed theme. See how the static design is split up into the various WordPress theme files, and discover how the simple PHP snippets can add that dynamic functionality of a blog.
The design concept
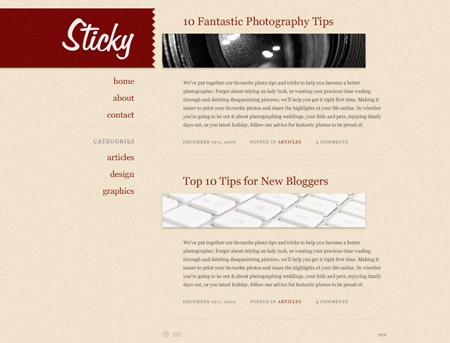
The theme I’m working on is named Sticky. The main feature of the design is its sticky sidebar (hence the name Sticky!), which stays in place while the main content scrolls past it. There’s also a few fancy effects such as the shadows and inset text appearance that I’ll be building with the help of CSS3.
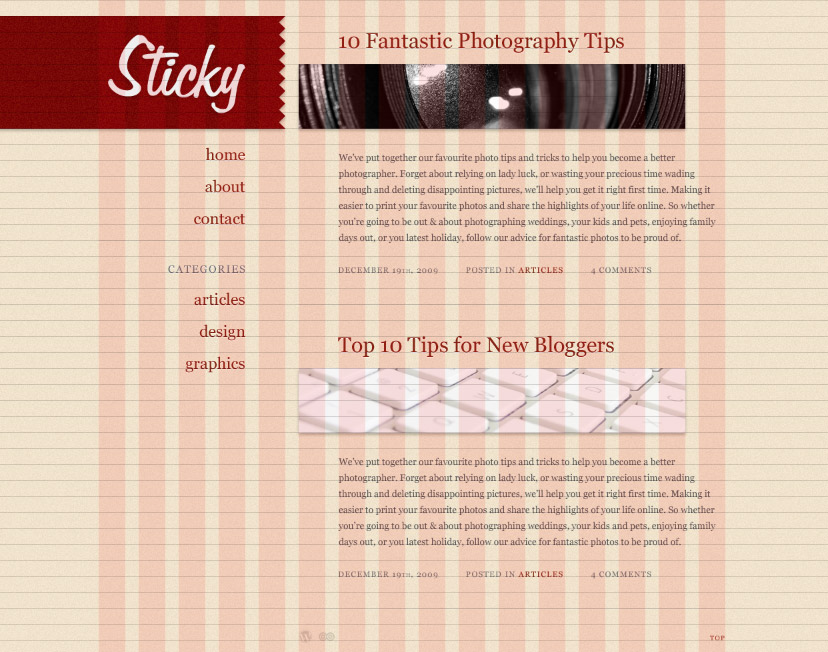
With the post focusing on the production of the theme, I won’t go into too many details on how the design was built, but you can see from the Photoshop previews that it uses a 16 column grid with 24px baseline; a fairly muted colour palette of a beige and grey, with a dark red as a highlighting colour for links; typography is set to serif font throughout for that touch of class!; and the whole design uses very subtle textures to give a more realistic and tactile feel.
Anatomy of a WordPress theme
Before getting stuck into the build process, it’s important to know how WordPress themes work. If you’ve looked at any prebuilt theme, you’ll notice that it’s all contained in a folder, and there’s around 12 core files. Some themes, including the Default WordPress theme, include more files which allow extra customisation, but aren’t mandatory additions. Here’s an overview of the main files you’ll be working with:
- header.php – Contains everything you’d want to appear at the top of your site.
- index.php – The core file that loads your theme, also acts as the homepage (unless you set your blog to display a static page).
- sidebar.php – Contains everything you’d want to appear in a sidebar.
- footer.php – Contains everything you’d want to appear at the bottom of your site.
- archive.php – The template file used when viewing categories, dates, posts by author, etc.
- single.php – The template file that’s used when viewing an individual post.
- comments.php – Called at the bottom of the single.php file to enable the comments section.
- page.php – Similar to single.php, but used for WordPress pages.
- search.php – The template file used to display search results.
- 404.php – The template file that displays when a 404 error occurs.
- style.css – All the styling for your theme goes here.
- functions.php – A file that can be used to configure the WordPress core, without editing core files.
Each of these files then contains a series of PHP template tags. These tags tell WordPress where to insert the dynamic content. A good example is the <?php the_title(); ?> tag, which pulls in the post title and displays it in your theme:
There’s stacks of template tags available, and more often than not there will be one that does exactly what you want – It’s just a case of finding it in the WordPress Codex. I’ve seen many themes that include some complicated PHP coding to achieve a function that’s already available as a simple template tag, so remember to browse the WordPress Codex whenever you’re stuck!
The basic HTML and CSS
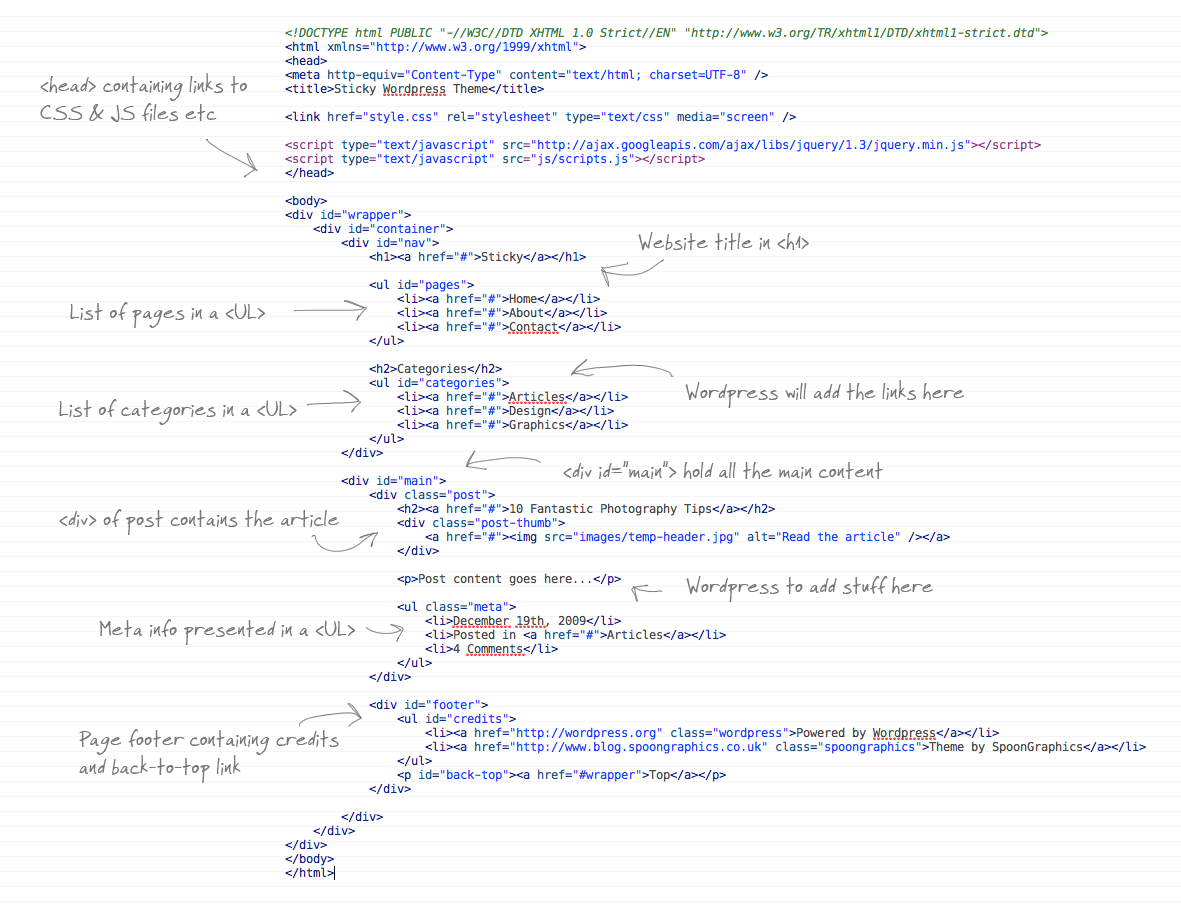
Seeing as a WordPress Theme is basically made up of HTML and CSS, but with a few extra PHP tags inserted here and there, it’s important to build your website concept as you would a good old static site. I tend to build the complete page with dummy content, then do my browser testing before starting work on the theme. Here’s an overview of my HTML code:
Building the WordPress theme
Now the actual design is taking shape in code form, it’s time to start converting the static HTML and CSS into a WordPress theme. Begin by creating a folder for your theme and creating the php files above (header.php, etc). Sometimes it’s easier to download the WordPress application, then duplicate the Default theme, and delete out any extra fluff that comes with it. Either way, you’ll want all your PHP files in place, and all your images and Javascript files copied into your theme folder.
Configuring the stylesheet
All the details of a WordPress theme are contained within the stylesheet. At the top of your style.css add the following code, then amend the details to suit.
/*
Theme Name: Sticky
Theme URI: https://blog.spoongraphics.co.uk
Description: Sticky WordPress theme
Version: 1
Author: Chris Spooner
Author URI: http://www.spoongraphics.co.uk
*/
Also remember to ensure that the paths to any background images are correct in your CSS properties.
Populating the header
Open up your header.php file, and paste in the head section from your concept HTML file. Then we need to go in and replace certain elements with the correct WordPress template tags to ensure it all works correctly. First we can strip out the title and insert some WordPress template tags. bsg_title(); will display the title of the page, which is followed by bloginfo('name'), which will place the blog’s name (set in the admin panel).
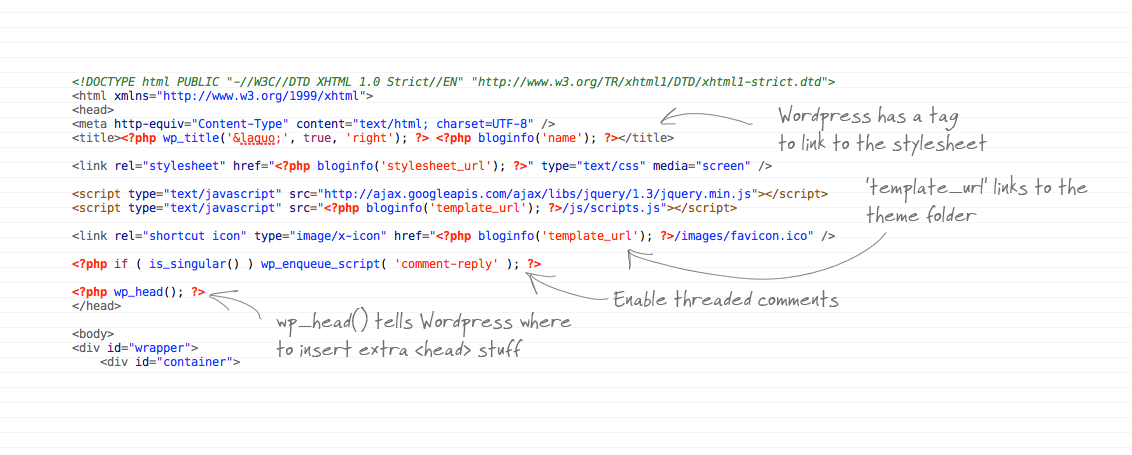
bloginfo('stylesheet_url'); is the snippet used to call the stylesheet. This replaces the manual path we created in the concept. Other files, such as Javascript can be called using the bloginfo('template_url'); tag. This renders the path to the theme folder in HTML.
If you would like your theme to make use of threaded comments, a snippet can be placed that will call the relevant Javascript files from the WordPress core. Then to before the closing </head> tag, add bsg_head();, this is where any additional head elements are placed by WordPress plugins etc.
Building the index
The next step is to flesh out the main body of the website. Open up the index.php file and paste in the main bulk of the concept HTML.
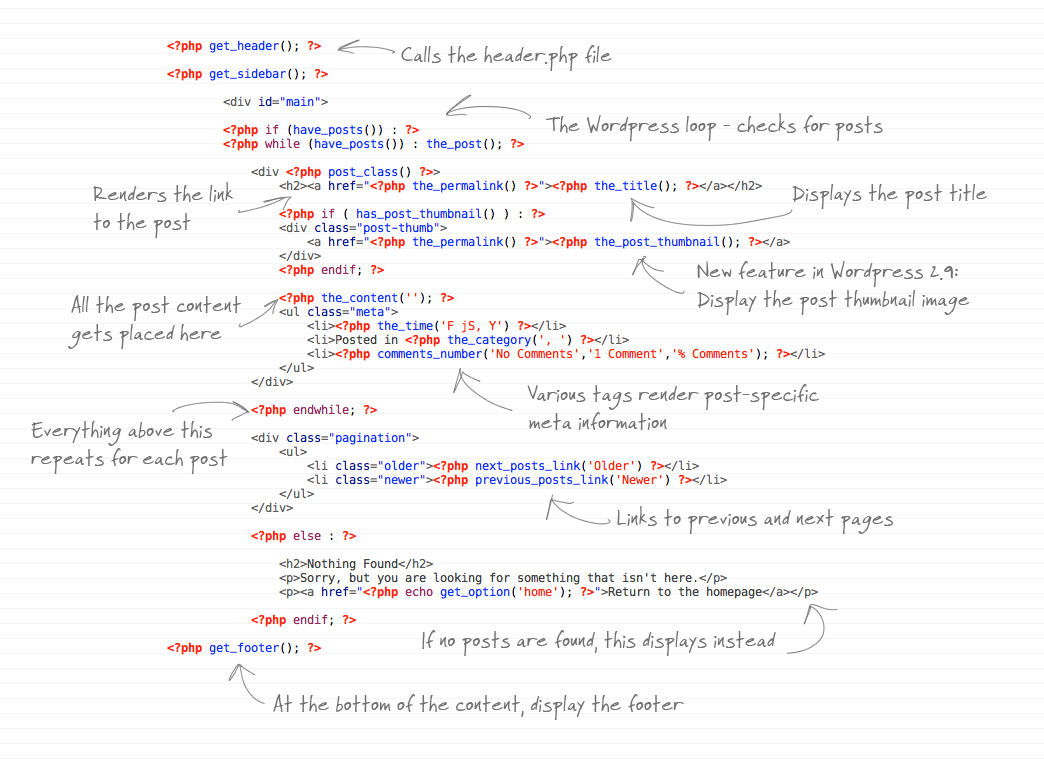
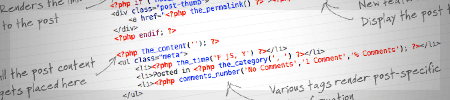
This is where all the meaty stuff begins! At the top we have the get_header(); and get_sidebar(); tags, these call the header.php and sidebar.php files and render the content according to where the tags appear. The WordPress loop is then used to check for content, if there’s content available it’s rendered onto the page. Within the loop we have various tags that display the post information, such as the_title();, and the_permalink();. These are wrapped in the usual HTML elements according to their purpose, so the permalink is wrapped in an anchor tag and the title in a header 2 tag.
the_post_thumbnail(); is an optional addition, but this code simply makes use of the new post thumbnail feature in WordPress 2.9. Below this is where we want all the article content to appear, and it’s simply inserted with the the_content(''); tag.
In the meta section, there’s various tags that can display specific information about the post, such as the time it was posted, the category it was posted in and how many comments it has. All of these can be called using a template tag such as the_time('F jS, Y');, each one also has certain parameters to further tailor the tag to suit. For instance the time can be changed to display in various formats. This is where the WordPress Codex comes in handy, to double check any parameter options you have.
Skipping down a little, the loop then displays an else tag, which will display if no posts are found, and the loop is finally closed with an endif. At the bottom we can use get_footer(); to call the rest of the page, which resides in the footer.php file.
Filling out the sidebar
The sidebar in my design is where the list of pages and categories are held. The sidebar.php file was called from the index using the get_sidebar(); tag, so anything within this sidebar.php file is inserted into the theme in the right place.
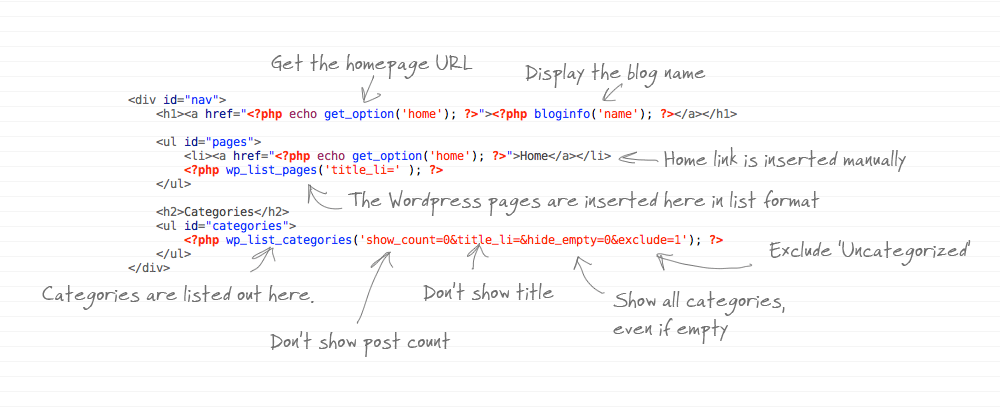
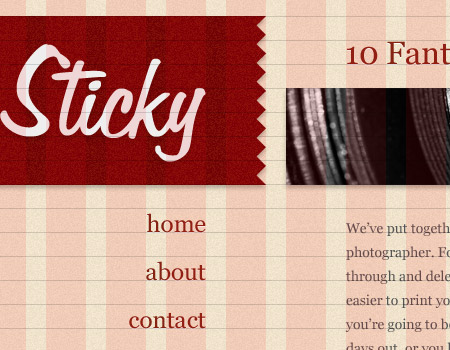
There’s only three elements in my sidebar; the logo, the pages list and the categories list. The logo is wrapped in a h1 tag and uses the tags echo get_option('home'); and bloginfo('name'); to render the URL of the blog and the blog name in the appropriate places. The pages list is simply added using bsg_list_pages('title_li=' );, where the parameter stops the usual ‘Pages’ title from being added. The list of categories is also pretty similar, bsg_list_categories(); is used along with various parameters to customise the tag, such as show_count=0 to stop WordPress showing how many posts appear in each category, hide_empty=0 to show the category even if it doesn’t have any posts, and exclude=1 to exclude the category with the ID of 1, which is the Uncategorized category.
Rounding off the footer
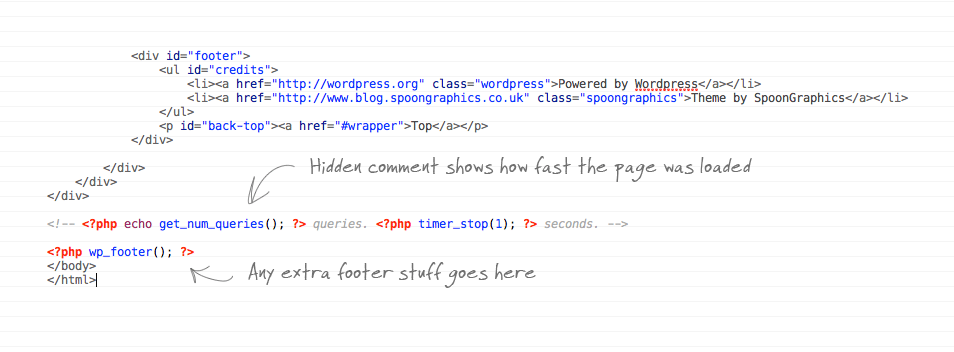
The footer.php file is probably the most simple file for this theme. The only thing that goes in here is the bsg_footer(); tag just before the </body>, so that any extra info can be inserted in the correct place. In your theme you might display a list of popular posts, latest comments or a list of archives. All of these can be done using specific WordPress template tags.
Creating the archive
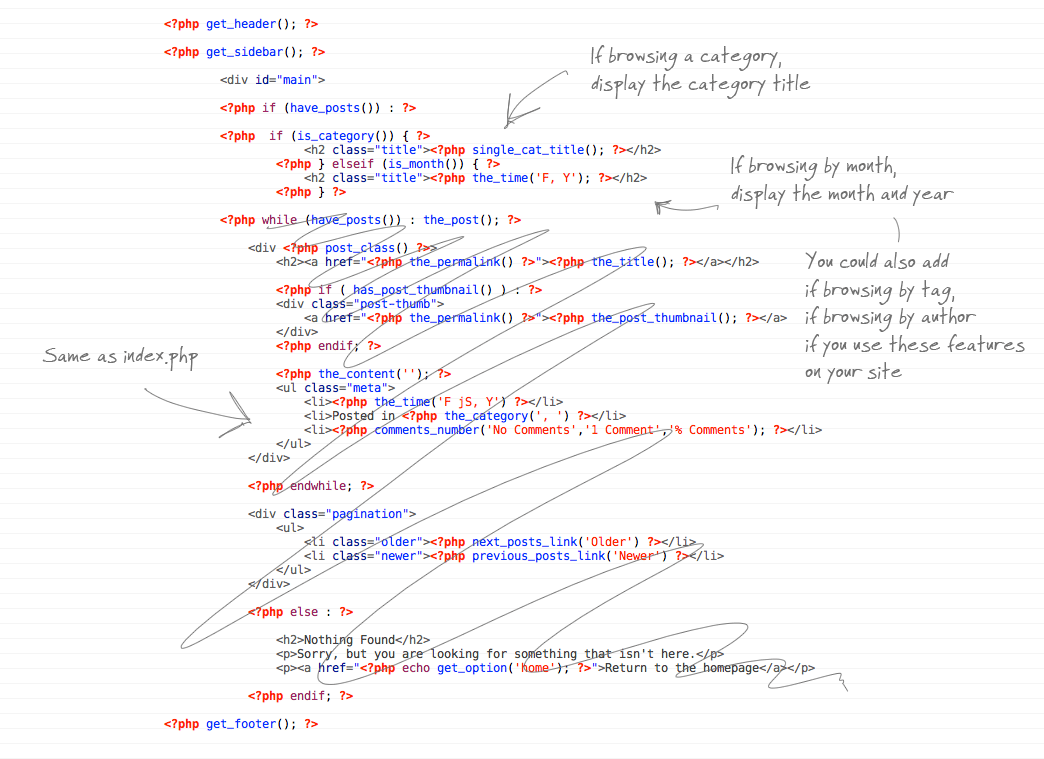
The archive.php file is used to display a list of posts whenever they’re viewed by category, by author, by tag etc. It’s basically the same as the index file, but with the addition of a tag at the very top that renders a useful page title, so the user knows where they are. ‘Browsing the Articles category’ for instance.
Constructing the page and single view
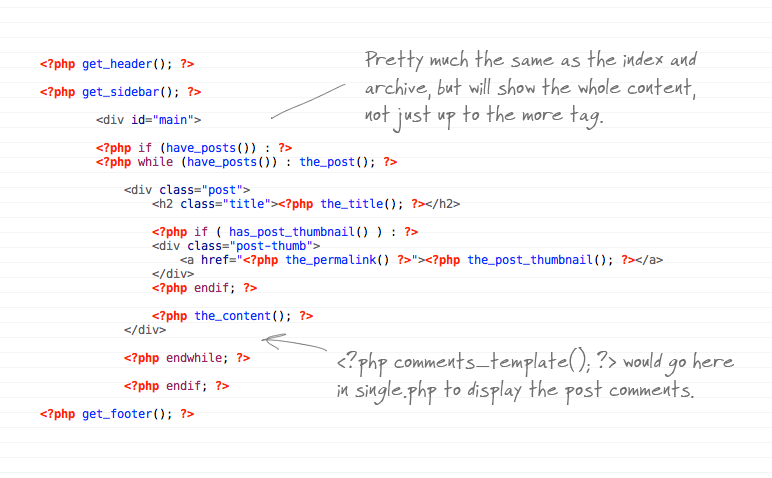
WordPress is made up of posts and pages. Posts use the single.php template file, whereas pages use the page.php template file. They’re pretty much the same, apart from that you tend to include the comments_template(); tag for posts, and not for pages.
Configuring the comments template
I usually copy the comments template from the Default theme, then make my changes because it includes some important lines of WordPress code.
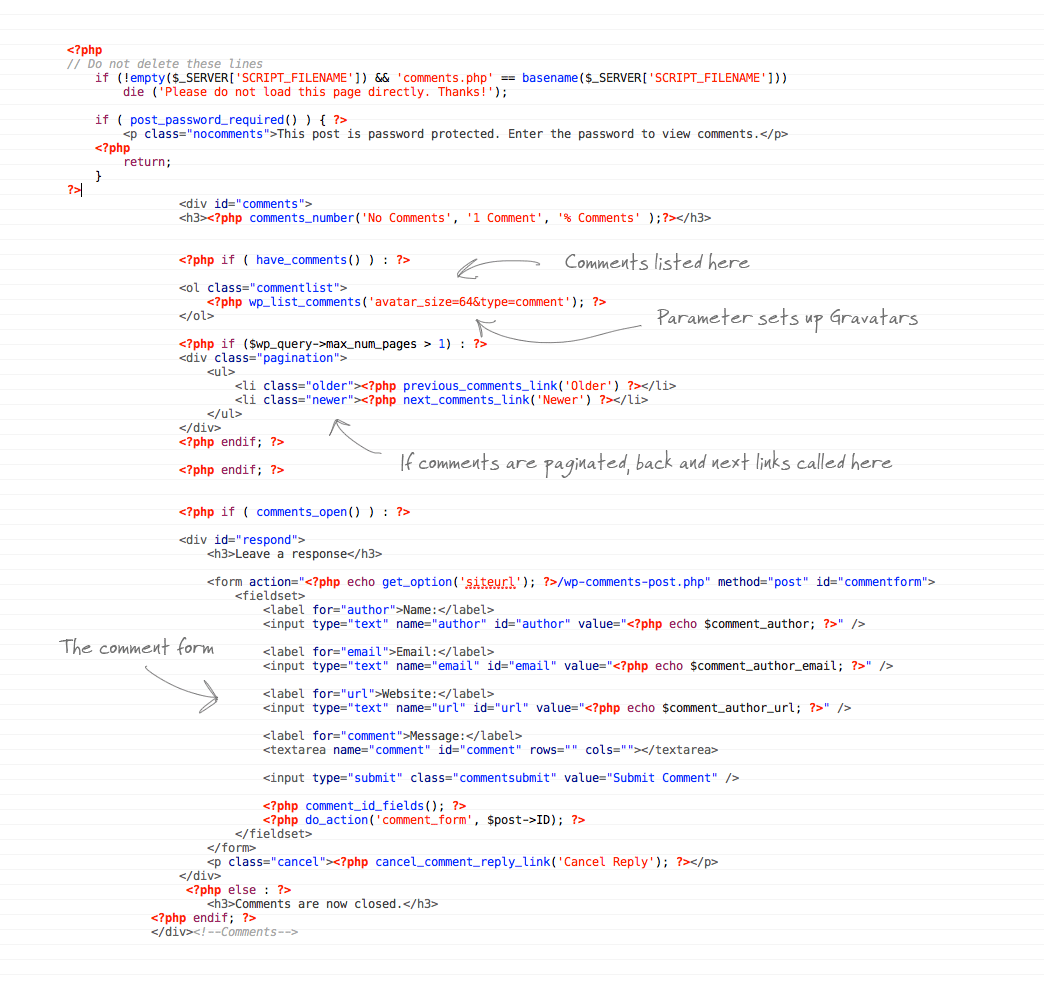
Once you have a comments file created, the same file can be used on pretty much all your future WordPress theme projects. The hard part is finding the CSS hooks to style up your comments. This is when the Firebug plugin for Firefox comes in handy. Otherwise, the comments file just has a few parameter options here and there that you might want to tweak. One that springs to mind is the avatar_size parameter, which tells WordPress how large to make the user’s Gravatar image.
Finishing off the search and 404
This pretty much just leaves the search feature, which is basically a copy of the archive.php file. A handy additions might be the line Search results for <?php the_search_query() ?>, which will display the user’s search term as a title. As for the 404 page, this is where your creativity comes into play. This template can be configured to display whatever error information you like, just remember to include the usual get_header();, get_footer(); tags where necessary
The final theme
When all your theme files are complete, it’s time to install a test and see how it all works. Filling out a temporary install with a couple of dummy posts can really help test drive a theme surface any errors. If you take a glance at the source code, you’ll see how each of the template files has been inserted into the correct place, as well as how content has been dynamically generated by the template tags.
View the final WordPress theme demo
If you like the look of the Sticky theme, it’s due to be released exclusively to Access All Areas members next week.
Thanks Chris for this tutorial. Bookmarked for future reference. Am very good in XHTML/CSS but not getting time to convert my files to wordpress theme. Hope this help
Very nice Chris. Thanks.
Hay Chris, nice post! Thanks for this, I’m just getting to grips with word press at the moment. Hoping to launch my blog soon.
Cheers guys just what the doctor ordered, had a enquiries about wordpress but never really explored the code on how much hassell it would be to theme. This has made it so much clearer. Thanks
Thanks Chris – bookmarked for use and re-use…
This is great. I have my own wordpress site but hope to design my own theme for it when I have the chance – this will really help!
hey, thanks for the detailed tut.
thanks for the tutorial! i’ve bookmarked it for when i have a spare afternoon, to try it out :)
It’s certainly a good idea to experiment and build your first themes from scratch.
Nowadays, I use the Hybrid framework to get a headstart on my WordPress projects.
Thanks Chris, just what I needed. Even the function of the sticky sidebar is what I need. I’ve bookmarked it for future use.
Some nice tips there, saved in favs!
Hey, this is just what I was after…
Going through the steps now…
thanks! :)
Thanks Chris an in depth article that I actually have read all the way through. Liking the layout of your articles more lately btw :)
Really nice guide, thanx. Although if the theme is not going to a free download and it’s going to be used only for personal use, you could save a few trips back to the server by hard coding the paths for stylesheet the links to the homepage etc.
Other than that, a great tutorial :)
I’ve been thinking of looking into creating my own WordPress theme, or at least learning how to do it, so this will be very useful indeed!
This is great! Can you make this a downloadable PDF?
It’s a great resource.
If you go to File > Print > Preview it should bring up a nicely formatted page, which you might then be able to save as a PDF?
Great job! Maybe this one will finally force me to digg depper into WP’s themes.
Awesome article Chris!
I’m learning how to create a WordPress theme at the moment. It will be very useful, thank you a lot.
Chris,
Just a few days ago I was looking for a tut showing how to take an HTML/CSS-based design and biuld it out into a WP theme. This is exactly the kind of straightforward direction I was looking for.– Thank you!
Great theme, I can’t wait until you release it. Can’t say I am going to use it, though.
Nice, simple tutorial. Very clear, thank you.
Could I be cheeky and ask you the name of the handwriting font you’ve used for your ‘code screenshots’? They’re really nice, it looks like a proper coding notebook.
It’s a font called Faraco Hand. A fab little freebie – http://www.dafont.com/faraco-hand.font
Thank you for the font name.
Thanks so much for this Chris!
I am just getting into the whole blog thing and am using a WP theme. Would love to design my own but was too scared to tackle it. Bookmarked this for my reference. Hopefully I succeed. Thanks again.
Thanks for a really nice detailed post.
I enjoyed reading it.
Jen
Hi I find something really important is missing here and it is the wordpress template hierarchy http://codex.wordpress.org/Template_Hierarchy
This can save you a lot of time and make your theme very powerful and flexible
True. This is a good resource for anyone looking to add that extra level of functionality to their theme.
Hi I find something really important is missing here and it is the wordpress template hierarchy http://codex.wordpress.org/Template_Hierarchy
This can save you a lot of time and make your theme very powerful and flexible
Please delete the comment above comment this has my gravatar :)
You have no idea, How long I’ve been looking for this!!!! Thanks so much!!!!
Excellent post. I’m still the “let’s just hack up some other theme” guy. Reading this post makes it easier to make the plunge and actually go for it.
Building on existing themes is a great way to start, it gives a good insight into how the template tags are used.
I want to learn to make my own WordPress themes. This Tutorial is Great Chris. Thanks
It looks like it will be very helpful. I have a client that I think
this will be useful for. Thanks for such easy, clear, doable
steps. I am anxious to try it.
Great tutorial! I did a similar one last week, but mine focused mostly on setting up the custom name and thumbnails for the theme and setting up custom templates for different categories, tags, etc.
Custom templates for categories, tags, etc sounds like an interesting topic itself. Feel free to post up a link.
I admit i did not read the whole tutorial, but the idea with hand written comments in the source code is awsome – hope you don’t mind if i use it on my blog?
Funny, I just built one from scratch a couple days ago.
Thanks for the kind comments everyone. It’s great to hear that it’s proved to be a useful topic for a lot of people.
Nice work!!!
Nice, simple, and super clear – thank you sooooo much for providing me with a little more confidence to branch out and try this myself :)
“If you go to File > Print > Preview it should bring up a nicely formatted page, which you might then be able to save as a PDF” very nice..
I’m glad you have put this together. I’ve been wanting to get into building wordpress blogs but have really found anything that does a good job on explaining how to go about doing so.
Chris keep up the good work!
Thanks a million
You can also use bloginfo(‘charset’) and bloginfo(‘html_type’) for the metatag for content. That way you can control the content type and character set from the admin panel.
An example would’ve been nice of me. Here:
<meta http-equiv="content-type" content="; charset=” />
Really like the tutorial. It’s a super alternative for the “how to be a rockstar wordpress designer”. Thanks
Really nice looking theme that Chris! How would you make it so that wordpress displays related posts?
There are several plugins for displaying rekated posts. I would include some links but I’m surfing on my iPhone so not this time. You’ll find them in Google.
Great tut Chris!
I haven’t tried it out, but I saw this one in a “Top 10” blog post the other day… http://wordpress.org/extend/plugins/wordpress-23-related-posts-plugin/ Maybe it’s what you’re looking for.
Fantastic look into the depths that is wordpress, so many things you’ve made clearer for me now! Thanks for the great tut
Thank you Chris, I was looking for an article like that, but I would like a more complete one, anyway thanks )
Thanks for this post. I’ve been using the Starker theme as a starting place. This encourages me to start from scratch.
Thanks mate… that was awesome…
Nice tutorial, Chris. There’s a new plugin, I believe the name is Dummy Content, and it gives you just that–dummy content to populate your site while developing and easy to delete later.
I’m glad you took the time to do this Chris, I think you’ll help a lot of people. I remember my first time building a theme, wandering through the WordPress Documentation (which is very good) until I got what I was looking for. Your How-To will save folks a lot of time, and I recommend that people check out the WordPress Codex if they’re looking to do something extra.
Another great piece from you, Chris!
Chris THANK YOU! and just in time.I tried to use a wight board them and it just didn’t work. thank you.
Hi great i always wanted to know how to use word press themes. But I think there is a slight difference in the space used by left Navigation in between contact page and home page. Article and Design pages are also behaving same as contact page .I am using Firefox 3.6.
ahh i found it, It is due to the scroll bar.
Hi just want to get some thing right help me please any one!
I have the following in my theme directory all the php files and I have a folder called library and in it all my css,images,js files. so would I link the .js file like eg
<script type="text/javascript" src=" library/js/jquery-1.3.2.min.js”> or what? please help me
You will need to add the bloginfo(‘template_url’); tag so that WordPress renders the URL to /wp-content/themes/ (or manually add that yourself)
oky never mind I got it eg
<script type="text/javascript" src=" library/js/animated-menu.js”>
is how I had it and then I just added this ../ in front of the library/js/animated-menu.js so now its <script type="text/javascript" src=" ../library/js/animated-menu.js”> thanx Chris
Finally a tutorial which explains it pretty well. Good job!
Thank you so much for giving us a good, clean tutorial on how to build WordPress themes. Great job!
Really clear tutorial. Thanks so much for sharing.
Hey Chris, thanks for posting this comprehensive guide. As a transitioning, formally trained print designer, laying things out in such a simple fashion, makes it easy for me to grasp and put into effect. It’s amazing how most people are so scared of code. Most of my fellow print designers still can’t even code a simple e-mail newsletter. Just a good old image laid out in InDesign. Oh well.
Actually, creating a e-mail newsletter that displays correctly in the most common e-mail clients is even for experienced coders quite a challenge.
Great Tutorial in any case, very comprehensive and great for beginners.
Nicely done! You’ve explained the “hidden secrets” of blog design with such ease, it makes me think I should be able to do it. It’s always been a little obscure to me and your post helps a lot. Thanks Chris!
Great detailed tutorial, will bookmark it right now! Perhaps next time you can give us an example where the single and post files are different than the index file.
Thanks for sharing!
Hi Chris, i designed a theme myself. It almost works fine, but people not visiting much. Don’t know why? Can u suggest some tips on increasing viewers. By the way please visit my blog too. A comment from you will be great :)
Chris Great tutorial like other one´s that you post !
Have a great day and thanks for the time to write for us.
Chris, Thanks for the post! Very Helpful. After reading this post and your Web Design from PSD to HTML, I’ve become a “follower”. Keep up the good work.
As a custom WordPress Theme designer, this is definitely a clear and precise tutorial on getting started with customizing themes. Great article!
Very good article! The .php part still confuses me to death. I just want to insert the blog part into my page and be done but it looks like I have to redesign just to have a blog and yes I’m a Idiot.
Great post, Chris. I’d next like to see how you got those bottom sharing links below your post — maybe it’s not worth a blog post about, but I sure am curious!
Grat post Chris!
Thx. This article is just what i needed and i
really really love the way you made it. it really
motivates to start themeing :)
Thanks a bunch Chris! Great and thanks for sharing!!!
Wow, I’ve been trying to get used to WordPress for a while, and I’ve never seen such a simple, easy to understand theme building tutorial! Thanks Chris, you rock!
Hey Chris.Where is the styling for the Template?
hey sorry i got it. lol that was stupid of me.
Hey Chris , great article but i`m actually facing a weird problem making Jquery works here is a screenshot of my code and i can`t find why it`s not working
http://img52.imageshack.us/img52/1412/captureye.png
and i don`t get any errors in the firebug console while loading the page but i can`t make it work and i don`t know why , i hope you can help .
thanks
I can be a little bit tricky to implement jquery (or other scripts) into wordpress. Luckily wordpress has a native function for that.
Simply include: in your header, before the bsg_head tag.
You can also check out this article on digwp: Including jQuery in WordPress the Right Way
Sorry, wordpress obviously swallowed my code example…
Include: bsg_enqueue_script(“jquery”) in front of bsg_head
Hey Chris, I was wondering if you could share the CSS for this theme. And show how this correlates with the design.
Hey, I’m having a hard time, in following this tutorial. I don’t know what I’m doing wrong but “wordpress” or “php” is giving me hell.
I need some pointers!
One of the best tut’s I have EVER seen! Thank you sooo much :D!
Heh, I’ve been figuring this out myself over the past couple of weeks way of blood, sweat and tears.
Should’ve published earlier man. Still, it’s very interesting to read this over and see where I can pick up a couple more tips and details. Great post.
l like this, l want to start here for my theme l think
Fantastic tutorial, Chris – unfortunately I’m getting an error message and I don’t understand why…
“Fatal error: Call to undefined function has_post_thumbnail() in …/theme/index.php on line 23”
Strange question, how did you do the handwritten notes? Is that a font? And those cool arrows! I imagine that would be useful (…please don’t say you actually drew it by hand)
Hey Chris,
another fantastic tutorial!
Only one thing to improve: JavaScript includes shouldn’t be in the head section but the last thing before the body closes. This speeds up the page rendering time a lot! ’cause the body is rendered before the complete JavaScript is executed.
Thank’s for this tutorial…
we wait for the new and more than that and more theme
Hi Chris,
Great tut as always,
you don’t feel like turning this tut in to an e-book do you.
I Would really appreciate it and I think others would too!
Finaly found a tutorial like this, tks!
http://www.estudioflow.com.br
BEST TUTORIAL EVER!!!
Hey chris! Nice post, I just had a quick question: what do you use to code all of your sites. Coda? or something else.
Thanks, John
Excellent tutorial Chris. Thanks. I’m contemplating creating a custom WordPress theme at some point soon so I hope this will help :)
hi,
great article…i’ve seen plenty of wp theme cust but its the first time that i see source explained with comments and arrows (images).
The article is really meant to teach one the fundamentals of wp.
thank you so much,
regards,
brett