
This post was originally published in 2007
The tips and techniques explained may be outdated.
For those who already know about Automate Batch, this article may not be of much interest, but to those who don't, reading on could possibly be the best moment of your life (or at least this week!).
Imagine how long you must have spent doing repetitive jobs over and over again in Photoshop, for example opening a batch of photographs; resizing them; saving them; then resizing and saving them again for thumbnails for your website.
Well, actually there is a tool in Adobe Photoshop that will do all that for you – Automate Batch!
I can remember when I was first told about Automate Batch, and I've since passed on the knowledge to a couple of my designer friends who upon their discovery had the exact same response as I did, starting with a kind of depression when you think back to how many wasted hours you must have spent on those tedious processes, which then turns into a moment of epiphany when you use Automate Batch on a large job for the first time!
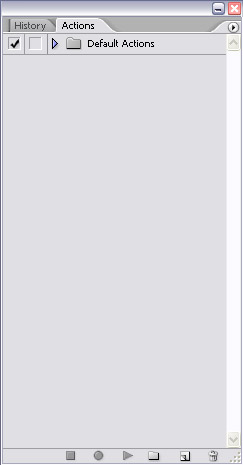
So, how do you use this Automate Batch thing? Well, firstly ensure you have the Actions Palette open (Window > Actions).
For the sake of this article I will modify a group of my photographs, by scaling down in size, desaturating then save a copy on my computer and close the file.
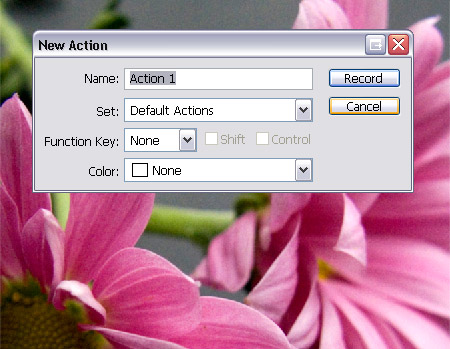
Open up one of your images in Photoshop, click the New Action icon at the bottom of the window, give it a name if you like, and press Record. You will notice the cirlular red icon in the Actions Palette which indicates Photoshop is taking note of whatever you do next.
Next perform your desired tasks, in this case scaling down the image (Image > Image Size), desaturating (Image > Adjustments > Desaturate), save a copy (File > Save for Web) and Close (File > Close).
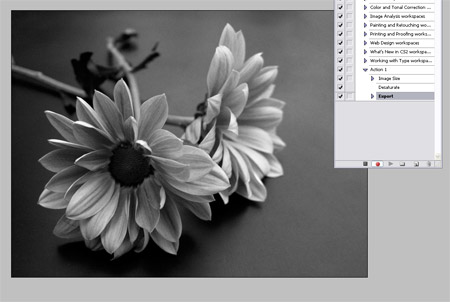
Once you have completed your tasks press the square Stop icon in the Actions Palette.
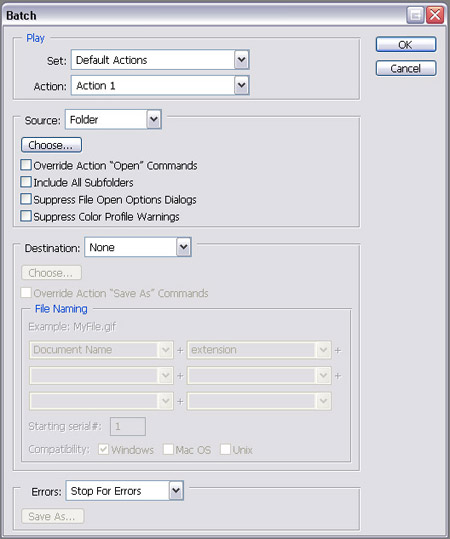
Go to File > Automate > Batch.
In the second dropdown you should find your most recent Action, if not, select it from the menu. In the Source section the most common selections are either to use files within a Folder on your computer, or use files currently open in Photoshop. For this article we're going to use the 'Folder' option, in which case ensure you select your appropriate folder from the 'Choose' button (the folder with your photographs awaiting processing). The Destination section further down has a similar interface with varying options, for this article we're going to use None because we already set an action to export the processed image through Save for Web. For other uses the 'Folder' and 'Save and Close' options could be used instead.
Once your desired settings are entered simply click OK, then sit back and watch your computer do in seconds what could have taken you hours!
Press escape at any time to stop the automation, otherwise wait until the process is complete then find a bunch of resized, and desaturated images in the folder you specified earlier.
Obviously the Automate Batch can be used for many other tasks, while the Action is recording you can perform as many alterations you wish (filters, image adjustments, layers styles etc), which Photoshop will then repeat throughout the automation.

This is awesome!
I knew about actions but have never heard of the Automate Batch process before so this will help heaps with uni after all the tedious same processes I had to go through last semester.
Thank you oh so much. this will save me hours if not actual days of work
That is awesome. will use this technique a lot thanks!
you made my day mate,
i love you
That was absolutely fantastic!!!
I love you – I want to kiss you all over – I have been trying to find this for ages !!! Marry me !!
y didnt u put the final picture i mean the result
hi, I’m the iranian. I very very happy to find your blog and study very things by U. you are my teacher .
please teach me more.
thank you my friend
If you’re doing thumbnails for websites why don’t you use php-code to resize the images before they are shown? Saving thumbnails seperately is waste of space.
Thanks, this is very useful!
Yes, this will help, but for some action it really doesn’t work for me. Prefer to do it manually.
@willy:
because imagine having about 20 thumbnails on a busy website..
saving the thumbs would take no more than, say, 1mb at max.
if you have to resize the images EVERY time a visitor vists your website, the serverload will skyrocket…
I agree that php could easily resize images, but please, save them when they are..
This is really cool. For a thumbnail technique, I would suggest making a “thumbnail” folder for the batch to loaded to. Otherwise, the batched thumbnails will want to save over the original versions.
Amazing!! I use actions a lot!! This will help me for sure =) Thankssss!
Yeah, this just isn’t working for me.
I follow it, but all of my screenshots are being named as “00001.jpg” instead of “00###.jpg” and it’s extremely frustrating.
****…
Wish I knew about this a week ago when my dad asked me to fix 1,004 images for his digital picture frame.
On the bright side, after 9 hours of editing, I could do 90% of the work through the keyboard. :D
This is AMAZING!!!! Just saved me hours of work when trying to email 85MB of images to someone – now down to a 20MB ZIP (but still taking *ages*)!
Thanks you SO much!
This is a very goo tuotorial. I saved a lot of my time by doing like this.
is it possible to extract data from Excel to a template in photoshop ?. Eg. Making different ID cards by using a photoshop template and all relavent data stored in Excel.
can you guide me ?
Batch automation was very nice. I want little more.
i waqnt to make ID cards for schools. I want to use a template in photo shop and to put variables in it such as name, class, DOB, address, phone etc and to save them in different names. The data in the microsoft excel to be used. Is it possible to do it. Help me.
Thanks, this is very useful
ehliyet sitesi
Oh man, watching it cycle thru hundreds of pictures is so satisfying. I think I’ll go relax and have a beer while this is doing all my work for me. Your help is much appreciated.