
This post was originally published in 2007
The tips and techniques explained may be outdated.
Sooner or later every designer comes across the exciting job of producing a map, whether it’s on a leaflet or website the overall aim is to visually document a particular area of land to allow for people to find their way to a place of business or event.
An important factor is the amount of detail required for the map, for most situations the map should be basic enough to provide a recognisable road structure without too much intricate detailing. As you will have seen on existing maps, the use of graphics and colours are important to distinguish between different types of road, this tutorial will cover the process of using Illustrator brushes to create a map of a small road network.
The finished map graphic needs to be crisp and clear which is why the map will be created in vector format in Illustrator. Imagine if the map needs to be enlarged on the leaflet as a client requirement, in Photoshop you would be left with fuzzy pixelated edges. Plus, the complete map will be editable allowing the road shapes to be tweaked without having to delete and redraw the complete line.
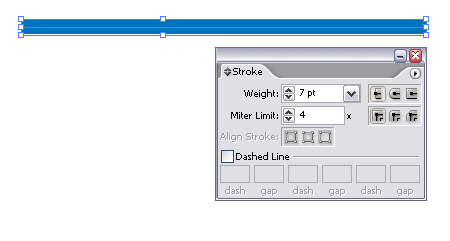
Start by drawing a straight line (hold Shift) on your new documents, add a quite thick blue stroke. This will be the base for our UK Motorway, being the largest type of road this line needs to be the thickest.
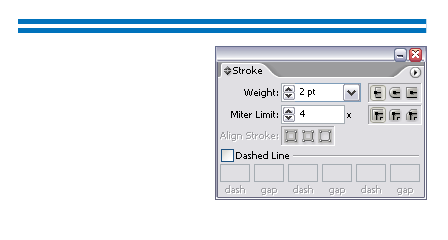
Copy and paste the line back into place (CTRL / CMD + F), and change the weight to a thinner stroke and colour in white. This will give a blue and white striped appearance to simulate the dual carriageways.
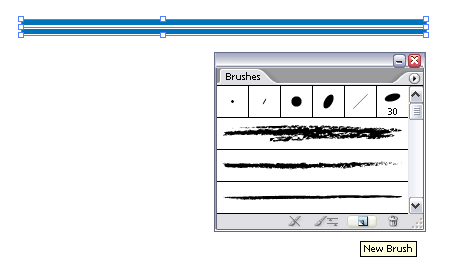
Select both of your strokes and click the 'New Brush' icon in the brushes window.
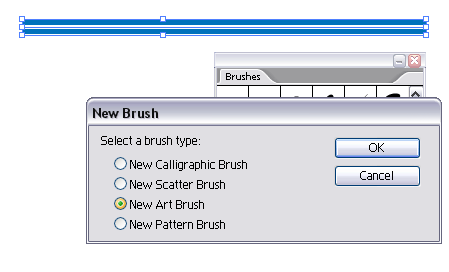
In the option box select the 'New Art Brush' radio button.
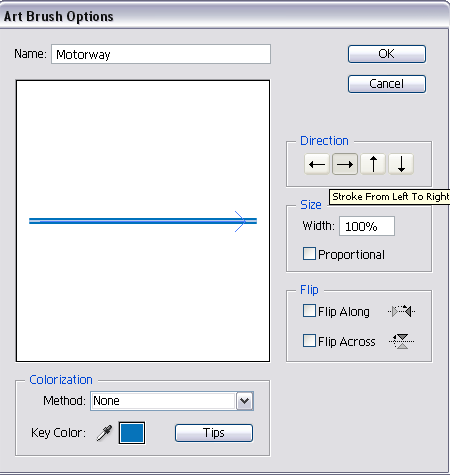
In the next dialog box you have the option of naming your new brush, in this case it's a 'Motorway'. Also check the direction is running along the length of the brush and not across it.

You will now notice your new brush appears in your Brushes Palette. (I have deleted the default brushes here to allow for easier access)
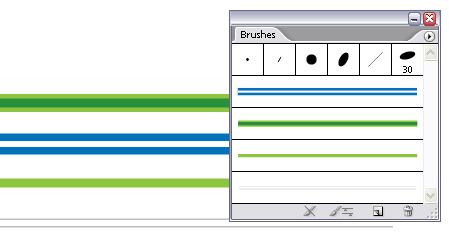
Go ahead and repeat the previous steps to create a selection of brushes to represent the different road types. Experiment with different stroke weights and arrangements to produce some interesting effects. Remember to produce these brushes according to the hierarchy of the roads they represent, for example a minor road needs to be thinner and less prominent than a major road.
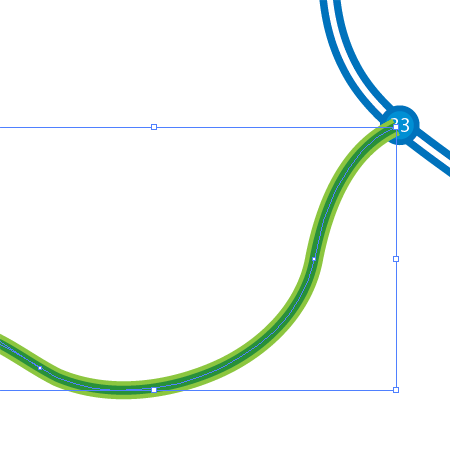
TIP: Extend the inner stroke outwards slightly on roads that will need to interconnect, this will allow them to merge together without the outline running across the joint.

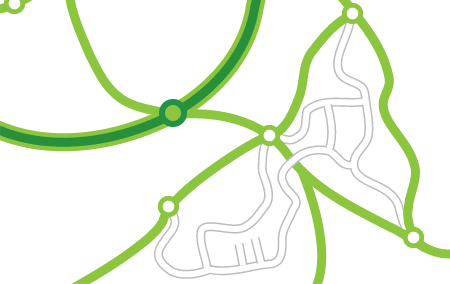
As well as the road graphics, use circles to produce matching junction icons. Using similar fill and stroke colours will allow them to blend with the roads.
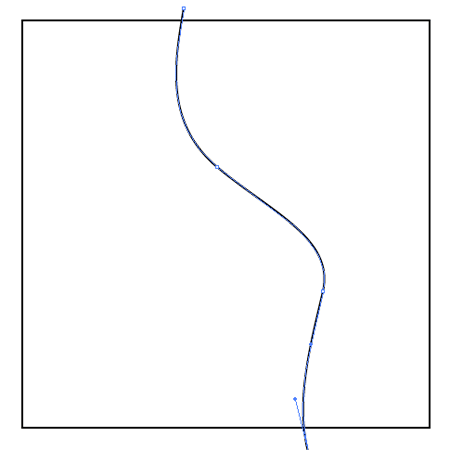
Now we're ready to draw the actual map, create a container box for reference and press CTRL / CMD + 2 to lock it. Don't worry about any roads extending beyond this container, we'll clip these later.
Use the Pen tool to draw your first major road, refer to an existing map to ensure the shape and scale is correct. This is where all you USA residents have it easy! The UK is full of curly whirly roads which are great for driving on, but a pain to draw up!!
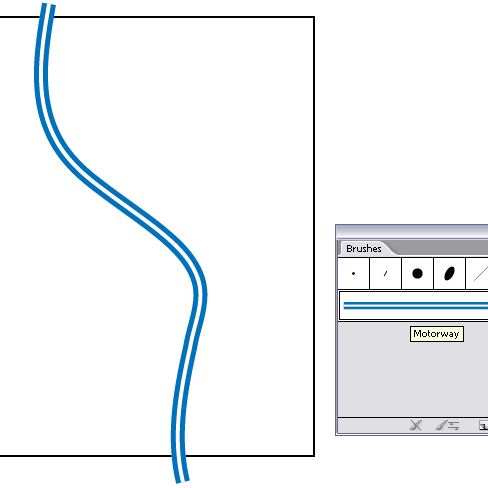
Add the appropriate brush to the new path, transforming it into a Motorway.

Add in a couple of junctions where necessary and use the text tool to provide additional information.
To add an interconnecting road draw the path as required, then use CTRL / CMD + [ to send the new path to the back of the stack allowing for the junction circles to remain on top.
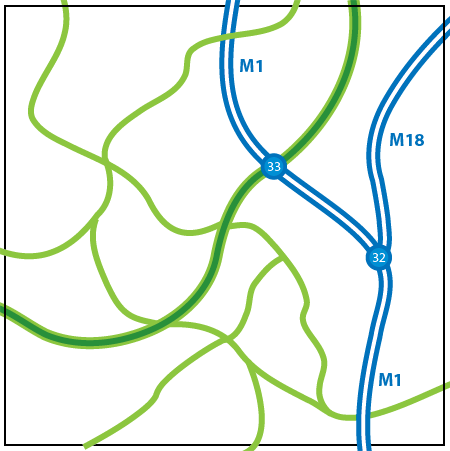
Continue drawing paths and selecting the appropriate brush to produce a network of roads.
Go in and add in the junctions and roundabouts by copying and pasting the junction circles created earlier.
Work down the hierarchy onto the minor roads, which will be even more intricate. Draw each path and add the Minor Road brush. This is where the tip mentioned above comes in handy, allowing the roads to interconnect without the outline running across the joints.
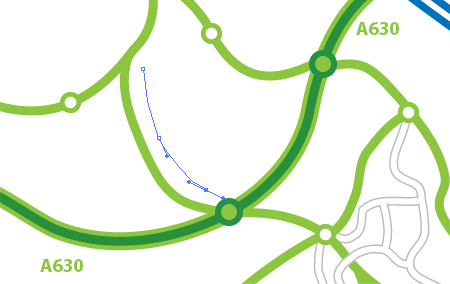
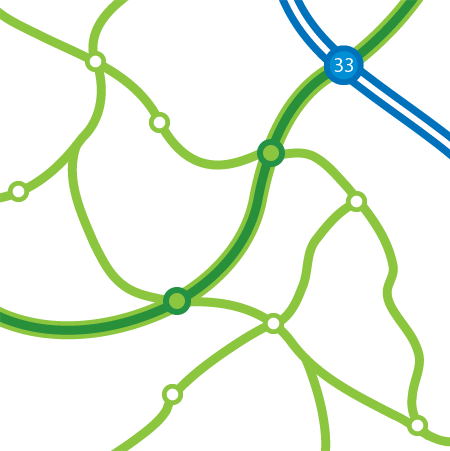
To add some names to your roads, use the Pen Tool to draw a path in a similar contour to a particular road.
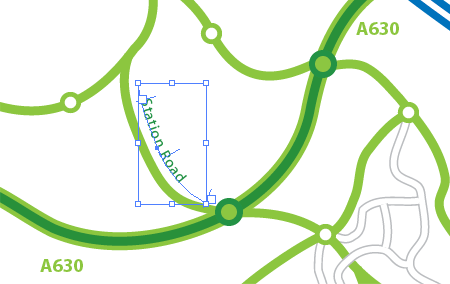
Then, select the Type tool and hover over this line until you see the Type of Path icon appear. Type out your road name and you will notice the text flow follows the line, you can use the little handles to edit the position of the text, or use the Direct Selection Tool to fine tune the shape of the path.
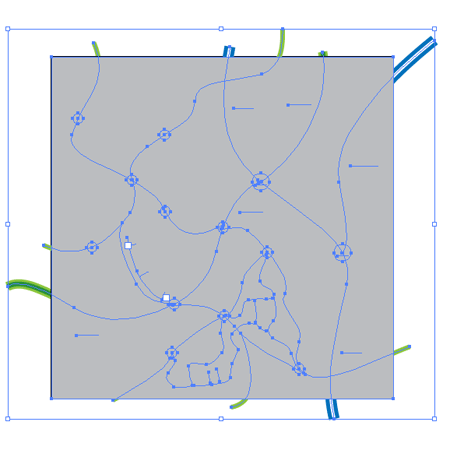
Finally, trim off the excess roads from beyond the container. Copy and Paste the container shape (CTRL / CMD + Alt + 2 to unlock the object), then select all (CTRL / CMD + A). Go to object > Clipping Mask > Create and notice how the lines are trimmed back to the outline of the box.


Very useful and interesting Tutorial.
What a brilliant idea defining the different roads as brushes!! I would never have thought of that!
Great tutorial. For extra precision, do a google map screen grab for tracing!
Excellent tutorial! Man, I would not have to create a map as detailed as you did. It is awesome though!
Awesome tutorial. Right at the moment when I needed something like this.
Thanks heaps!
Great! Ths! It will help me in my project in the univercity!!! Great!
Thanx man, just what I was looking for…
:]
hey u r grt…i really luv ur tips why don’t u post more n more so that we can learn more…:)
Very nifty! Pretty Usefull .
Thanks
bvala;laowuw
i just skimmed over the tutorial and i think one last tip could be useful – creat PERFECT INTERSECTIONS doing so:
1 instead of BRUSHES create GRAPHIC STYLES
2 create for each kind of road an own LAYER and name them
3 create the roads as vectors (each type of road on the same layer)
4 SELECT one layer as a whole by clicking on the circle right in the layer palette
5 allot the GRAPHIC STYLE to the whole LAYER > INTERSECTIONS WILL BE AUTOMATICALLY DONE PERFECTLY!
very nive tut..thanks:)
Hey I did this tutorial and when I use the brush on a pen stroke it shows like a cut off with white filling? I’m quite new to Illustrator so maybe I’m doing something new?
Thanks, very nice.
This is a great tutorial, and couldn’t have come at a better time – a design job just came in requiring an illustrated map of woodland trails. Talk about timing.. I also used some cool foresty brushes i found here: http://melsbrushes.wordpress.com/2008/01/18/tree-maker-illustrator-brushes/
Anyway – many thanks, another great post which helped me out loads!
Oh I’m about to make a map and this tutorial comes in handy.
Thanks a lot buddy, your brush tip saves me a lot of time.
Keep up the great tutorials!!!
WOW! I have been drawing all kinds of maps using Illustrator since 1999 and i thought I knew it all. I was using the Pattern Brush or just drawing by hand up until I found this site. Now I use the Art Brush and am drawing maps faster than ever!
Thanks for your info and if anyone needs a whole crapload of map icons….just give me a ring.
Thank you, very nice tutorial.
Just have to modify it for german roads and its other colors and stuff.
thank’s
I’ll Use this info usefull in korea too^^
Haven’t gone through all posts, so this may already have been posted… anyways here goes:
For junctions you, also create new brushes – same procedure as with the roads – except you must select scatter brush instead of art brush (just use all standard settings).
Then use the pen tool (with smart guides enabled CTRL-U) and make junctions with one click.
We just do this by copying the paths over themselves and using different stroke widths, with the topmost path being narrower and with white fills. Special junction symbols become unnecessary if yo do it this way. You just need some layer management.
Anyone over the age of 40 who used Illustrator since the early days would do it this way, since it doesn’t depend on the brush feature.
This is great, thanks! Very helpful for the map I’m working on now. But one question: how do you make an inner stroke? Or is the two-toned green line actually two paths on top of each other?
Oh, I think the above post answers my question! Thanks!
Hell, I just got done with a map. Try not to do too many. It takes at least 5 years off your life.
It’s true everyone seems at some point – to be asked to create some form of map!
And this is a really nice tutorial!
Amazing Idea’s. Greats Job Brother… Nice to see u Blog.
simple lesson but great idea
I would i have to say this tutorial is quite esquisive!!! CHERRO MATE
NINJA rpg FTW
thanks it is great
Thank you!!!!!!!!!!
Thx for sharing
Great tutorial.. i realy like it! ;)
thank you for tutoria!!!
cool site , thanks
Great tutorial, well organised and presented.
Well what do you know, I am making a map this week for a client. Glad I found this! Thank you for the tutorial!
spiegami il mistero di cmd grazie
Brilliant!
I had to create a map at work in less than an hour and this guided me in the right direction. Many thanks and kudos!!
~*smiles*~
Thank you very much as well. I was trying to figure out how to do this for a board game.
Your explanation helped tremendously. I varied it a little in my design but you showed me several things that I can incorporate.
Truthfully, I never knew how to create a brush so I learned a lot with this tutorial.
It was a pain in the ass to draw a location map for me before that tutorial. Thank you so much …:)
Thanks for sharing!!
really use full…….. thankyou.
Time consuming working! Well done! This is just what I was looking for.
Great list of backgrounds. Here’s another great use of design and technique:
Well what do you know, I am making a map this week for a client. Glad I found this! Thank you for the tutorial!
Your explanation helped tremendously. I varied it a little in my design but you showed me several things that I can incorporate.
thank man very usfull info
Similarly road/railroad styles can be defined by stacking different strokes in appearance palette (e.g. 4 point white stroke on 5 point black one). Joining two crossing paths in compound path and styling them as mentioned takes care of proper look of joint (as long as angle between them doesn’t force strokes to stick out—it happens quite rarely though). It’s quite similar technique and I think a matter of personal preference to choose one or the other. It’s also most comfortable to use with the help of defined styles.
Anyway, I’m happy to get to know another way to draw a nice and easy to maintain roadmap! A very nice tut!
spiegami il mistero di cmd grazie
Hey….thanx a lot for the tutorial. it saved me a lot of stress..