This post was originally published in 2007
The tips and techniques explained may be outdated.
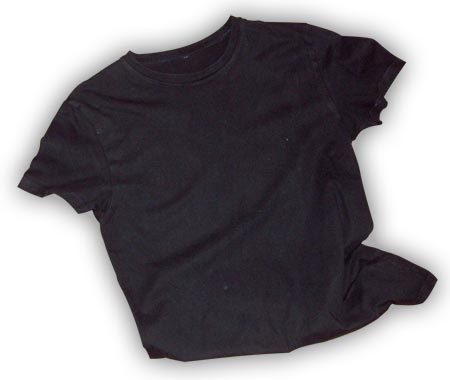
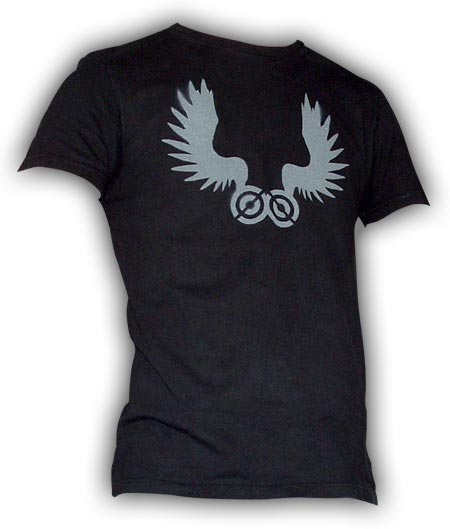
Create a low-cost, low-tech T-shirt using a digitally designed stencil.When low numbers or high expense prevents you from sourcing professionally screenprinted products, you can easily produce a small run of custom T-shirt designs using a good old fashioned stencil technique!
Advantages include low production cost and quick turnaround, also the low-tech feel to the finished product could help reinforce an urban or distressed brand, especially with a little extra overspray.
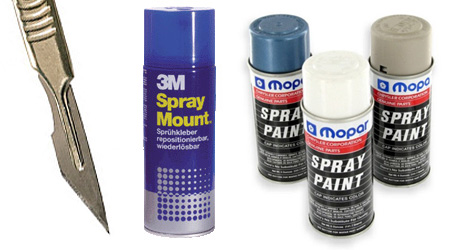
You will need:
> T-Shirt(s)
> Sharp Scalpel
> Spray Mount
> Spray Paint
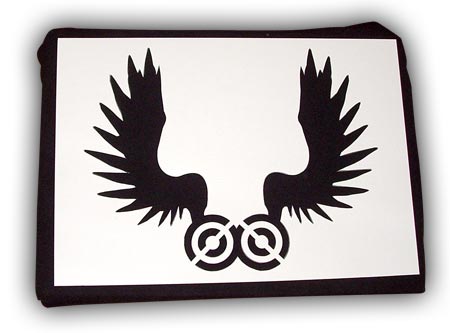
Create the initial design in your chosen application, in this case Illustrator was used with the addition of a free vector resource file from Go Media, where a graphic from the wings collection was modified and combined with the Spoon Graphics logo.

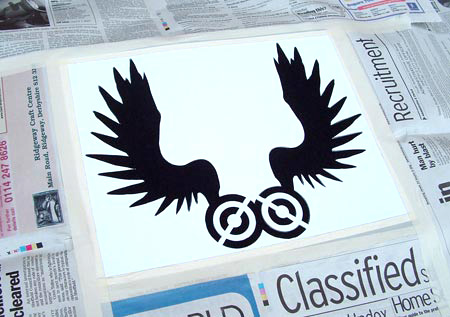
Remember when creating your stencil to plan ahead and think about what areas will be cut out, some areas may need splitting to allow the areas of negative space to connect. If not these areas would simply fall out when the stencil is cut out.
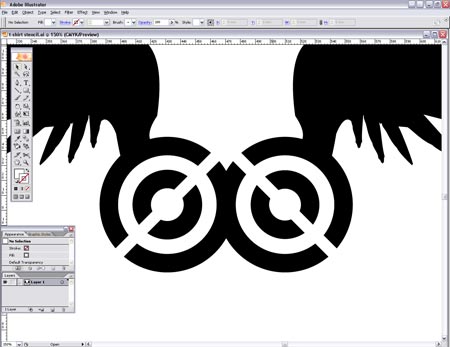
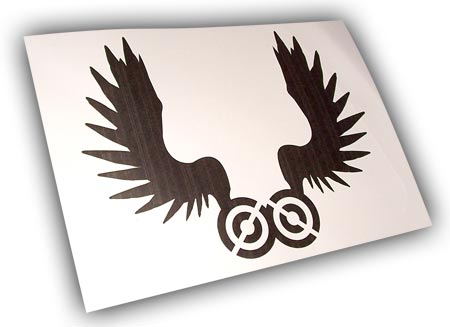
Once your design is complete, print it out onto card at the desired size.
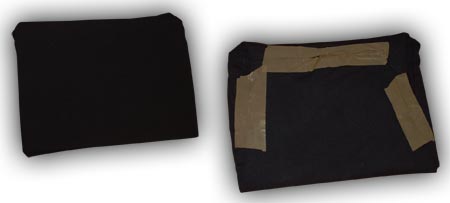
Place a board inside your T-Shirt behind the chest area and fold the material onto the reverse and stick into position with tape. This will help prevent spray painting other areas of the T-Shirt and will stop any paint seeping through to the back of the shirt.
With your scalpel carefully cut out your stencil, then give the rear a coat of spray mount to help stick the stencil down to the T-Shirt preventing overspray. Position the stencil on the T-Shirt.
Using plenty of masking tape and newspaper cover off the surrounding areas, ensure that the tape is firmly stuck around the stencil to prevent overspray. Give your spray paint a thorough shaking to mix the paint and activate the propellent, spray a couple of test sprays to clear the nozzle, then simply build up layers of paint onto the stencil.
Once dry, peel away the stencil and tape to reveal your design transferred onto your T-Shirt.
Hey I was wondering if you jsut used normal multi-purpose spray paint or if you used fabric spray paint?
Also is this a temporary sort of thing or can they be washed?
Either way this is a pretty cool idea and good tute.
I think this will come in handy for a music event i have coming up and am making t-shirts for.
good work.
Hi Eray
No this was just your basic everyday spraypaint, nothing special at all!
The T-shirt from this tutorial has survived being washed, however hand washing would be the best idea to prevent the graphic fading over time.
Glad you found it useful, feel free to send over some pics of your event T-shirts once they are done!
Chris | Spoon Graphics
love this tutorial,
what type of paper do you use?
just ordinary office (printer) paper?
Your usual 80gsm printer paper may be a little thin/flimsy. I used a bit thicker stock, I think it was approx 250gsm card.
Chris | Spoon Graphics
hi,
not clear on then spray mount part??
Hi James
The spray mount is used to help stick down the stencil to the t-shirt, especially the nooks and crannies that could otherwise lift from the t-shirt leaving a blob of overspray taking away the detail from your design.
A light coat on the reverse of the stencil should do, too much may leave a sticky residue on the t-shirt (which should come off with a wash anyway).
Chris | Spoon Graphics
Awesome tutorial. Looks like I will have to create one myself.. great work and the outcome looks great as well.
After I read this I looked over att he counter int he kitchen, and what do I see. 3 cans of spray paint, my hobby knives, and some posterboard..
wow, coincidence… definately…
Awesome tut. I made two t-shirts with that ( using my own desing of course :P ) and that was easy. Thanks from this.
Omg.. man you have no idea the life saver you are today, i was wanting to this long time ago but didnt want to pay for some one to do ma shirts with ma design.. man this is really coooooooool!! tnx a lot m8.. will put some pics when i’m done
Where we can use the Spray Mount?
What can the Spray Mount do on this shirt?
well…paper is actually really good. i print out the graphic in gray. save LOTS of ink. you’ll still be able to see the graphic…and when i’m done with that…
i take a transparency and put it over the printed graphic. cut it out. and i’ll then have a really sturdy, plastic, longlasting stencil(:
I have to problems:
1. I don’t where to get 3M spray mount in Australia and I’m still looking around.
2. Would I use this same method on say, the front skin of a kick drum. I want to put graphics on my kick drum before the next bunch of gigs.
If you can help, that’ll be really helpful.
Hi Kevin
Keep an eye out for the spray mount, there will be brands other than 3M. Check out your local stationery shop, it’s quite a common product in craft making etc.
Sure it will certainly work on the kick drum, or on any surface really.. it’s the same technique street artists have used for years to create some great artwork.
Fantastic tip from Tammy too! Converting the stencil into plastic would definitely last many uses :)
How do you iron your custom made t-shirts? Simply inside out?
Awesome tutorial. See my videos on how to do this with Bleaching at http://www.stencil1.com
Wow, this sounds pretty cool. I might try this out soon :) Thanks a lot. Your tutorials are really easy to follow with great outcomes. Thanks a lot.
Yeah, depending on the fabric and the color of the textile, spray painted custom t-shirts last at least for over 30 – 40 washes. I was painting logos of the metal bands some tens of years ago…. phew.
If the t-shirt is white, it fades quicker though..
Umm… that really cool design, I love your last black shirt.
Hey,
You can also use freezer paper (found where the tin foil and the wax paper is at most grocery stores). Just cut the paper to fit into your printer, print the design on the matte side of the paper, cut it out and then iron it onto the t-shirt. You’ll have to iron pretty good to make sure that it’s stuck down all the way, particularly the edges. You can also make “bridges” to parts you want white, and then use a pair of sharp scissors to cut away the bridges once it’s ironed down. Be careful not to cut the shirt, though.
Also, bleach works really well for dark t-shirts. Make sure you put something between the layers of your t-shirt, and dilute the bleach otherwise it will burn a hole in the shirt. Keep a bottle of vinegar nearby to halt the bleaching process and wear something you don’t care too much about!
Loved that you used illustrator to make your stencils!
Lindsay
Great Tute, 2 questions,
1.Is there anything i could use instead of spray mount?
2. Is it cool to use poster card to print the stencil on or do you need something stronger?
Thanks again
DL
awesome tute!
Do you have to spray the design on the inner side of the tee or the outer side??
Hey Guys
Another alternative to spray mount would be to trace your print onto clear sticky back plastic. Otherwise standard card would probably do – if in doubt give it a test to see if the paint bleeds through.
Derrik, the design was sprayed onto the outside of the t-shirt.
Also, thanks to Lindsay for some awesome tips. I’m currently playing with the bleach idea with a pair of jeans so there may be another tutorial coming soon!
Chris
Hi, nice tutorial, gonna give it a try once i’ve made a worthwhile design, and found a decent enough t-shirt (i’m fussy, i know).
Another nice twist might be to build the design in different colours, so create maybe 2/3 slightly different stencils, using diff colour sprays for each stencil. sounds like a groovy idea if u ask me!!
Genious! So simple and so cool! I will have to try it. I’m gonna make my kid cut out the stencil!
I donated and bought you a Red Stripe beer! I do hope you like it!
THanks! was having probs with making my new designs. Actually, my partner and I are making statement tees… Im having trouble with the a’s, b’s, o’s and anything that has holes and when you cut it, the letter will just fall off. And i was kinda wondering what’s the techinique for it…
By the way, your design totally rock! :) THanks for this info.
For letters etc. with holes, leave little bridges in the paper to hold parts that would otherwise fall off. After positioning the design with the spray mount, cut off the bridges. This way everything will be in place.
This only works for designs that you use just once though.
Thanks for the tutorial Chris! I’ve been looking for an alternative to the elusive Freezer Paper, being unable to find that in Europe.
Oh !!!! so by using digital stencils we can create the t shirts !!!
Wonderful !! painting and designing on t shirts is a favorite task for us..So we will enjoy it..
This brings back memories! I was doing this stencil technique 35 years ago. I made my own Team Canada T-shirt in 1973 with the original large stylized maple leaf on the front with the word CANADA on an angle. I spoke recently to a friend of mine who I made one for back then and he’s still got it! Another tip… make sure you wash the T-shirts before you spray paint them. That way any oil from handling, sewing and packaging is removed and the fabric absorbs the paint better which in turn stays on the shirt longer. Another tip instead of bridging letters. Put down the whole stencil on the shirt after you’ve cut it all out making sure you spray the parts of the letters you need for blocking. Then put down the letters without spray you cut out and stick the blocking parts with spray inside them. Then remove the unsprayed letters and everything is exactly in place. No bridging or cutting. Cheers!
One an use Freezer paper found in the aluminum foil part of grocery store. It has a coating on one side that you can temporarily iron your stencil to your shirt, spray and let dry, then peel back the stencil. You can get alot of uses out of one roll. If you are using the stencil again, place a thin cloth over all of stencil, lightly iron and lift while it warm. If you need to, iron two sheets together before you cut stencil and it will be a stronger stencil. Good luck
I did this as a kid, and the funny thing is yesterday my 12yr old was getting bored so we went out and brought 3 cheap t shirts and some spray paint from the local pound shop and will be doing them later on..David and Goliath eat your heart out lol..
Hey i ahve to try this out..though i don’t have much access to spary paints over this part of the world..but I’ll see where will i land!!
Thanx once again
hey, i’m a graffiti artist and have lots of stencils cut out of acetate (thin transparent plastic). would this stick to the tshirt the same with adhesive?
Also, i know you said your better off washing the shirt by hand, but is it possible to do in a washing machine with other clothes or will the paint run?
thanks for the great tut!!
hiii….your tutorial was great and awesome. i really want to try it. but i have difficulty to find the material color…..
before i ever tried to paint by using fabric color, not with spray…..but i paint with brush, that was need long time, because need time to paint….
i really enjoy your blog…
thank you
Very good and useful blog, all the best
The Custom T-shirt Factory
http://www.customtshirtfactory.eu/
Where or how can i make the stencil designs for my tshirts?
Hi, I was just wondering if theres any dangers to using spray paint? Since spray paint can be toxic I don’t want to wear my shirt and end up with a bad rash or something.
hey nice tutorial! how are you so precise with cutting out stencil?. we dont have 3m spray paints in india. though we have bottled fabric paint.. would i need to use a paint brich and apply it may be?
I liked your works very much and love to know meore about designing and the best softwares to use for the variowus designs. I would also love to know something on printing T-Shirts and other clothes as well.
Please enliting me on effective use of art pens.