Photoshop effects usually bring up thoughts of vibrant swirling lines and abstract pieces of stunning artwork, not to mention the not so cool Photoshop filters that have been the cause of eye-wrenching design choices for years. There are, however a range of effects that not only look great, but stay true to the traditional photographic techniques the effects originally evolved from. Here are 15 tutorials for recreating authentic photo effects such as Lomo photography, HDR and Cross Processing digitally in Adobe Photoshop.
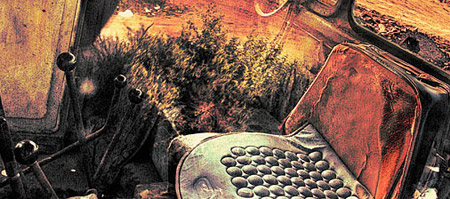
Pinhole Photography

A pinhole camera is created using a small box with a tiny hole, the overall form is extremely simple with no lens. DIY pin hole cameras are often made from shoe boxes and photographic paper. Check out this tutorial from theartofmypetskeleton to easily create an authentic pinhole effect in Photoshop.
Cross Processing

Cross processed photographs are recognisable from the unusual colours and tones in the final shot. The effect was originally produced from developing the photographic film using the wrong mix of chemicals. Nowadays, a cross processed style can be simply achieved in just a few steps. Photoshop Support shows us how.
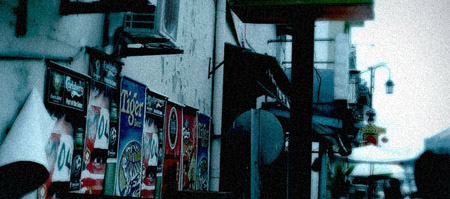
Street Photography
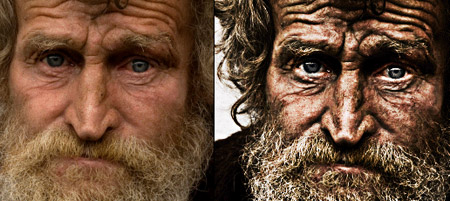
One of the most recognisable street photography shots is ‘Homeless Mike’ by Leroy Skalstad. The gritty, high contrast style of the image really emphasises the nature of street life. Recreate a similar image with this Dramatic Gritty Effect by Photoshop Frenzy.
Split Toning
The technique of split toning was originally developed from the printing process of a photographic image, using various toners to produce a subtle, multi-tone effect to the final photograph. Photoshop Essentials shows us how to use the Photoshop channel mixer and adjustment layers to produce the effect without the use of chemicals!
Rock Photography

Although not quite a photo effect itself, the style of rock photography has become a recognised approach to creating portraits of long haired rockstars. This overview from Computer Arts Magazine takes a look at some of the post-processing steps taken to give a classic rock feel.
The Dave Hill Look

Professional photographer Dave Hill has become highly acknowledged for his unique style of post-processing that gives a very strong and impactful effect to his portrait images. Many sites across the web present tutorials on how to create ‘the Dave Hill look’ yourself, this article from Flickr is one of the best.
Lomo Photography

The Russian made Lomo LC-A camera was manufactured a cheap alternative to the higher quality Japanese rivals. It was poorly made and the photographs it produced were just as bad, however as time passed popular culture brought the mis-coloured shots from the Lomo camera into a whole new light, which is now a very sought after effect. Not everyone has the opportunity of trying out the original camera model, but Digital Photography School has some great tips on mimicking the effect in Photoshop.
Infrared Photography
Infrared film used alongside an infrared filter allows the camera to block out the usual spectrum of light, allowing only infrared light to expose the film. The result is a false colour or black and white effect, the effect is particularly stunning with shots of foliage, where the reflections from leaves and grass are made visible and give the impression of a dream-like scene. Photoshop Essentials outlines some of the techniques used to create the Infrared effect.
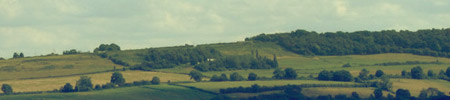
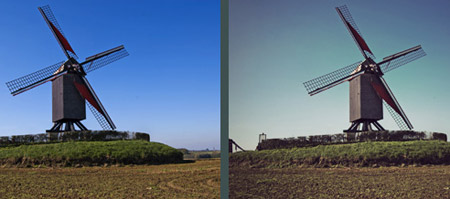
The Velvia Effect

Fujifilm Velvia film created highly saturated, largely contrasting and extremely sharp images, which made it particularly popular with nature and landscape photographers. PSHero takes a look at using modern day Photoshop techniques to recreate the Velvia effect.
Dark Grunge Photo Effect

The term grunge has evolved from the music genre also known as Seattle Sound, characterized by stripped down sounds and heavily distorted guitars. The term grunge also made its way into photo post processing, where the key features are muted colours and large areas of texture and grain. PSHero has this excellent tutorial for creating your own dark grunge photo effect.
HDR Photography
High Dynamic Range Imaging is a photography technique that produces an image with a much larger range of luminance between the darkest and lightest areas, making it much closer to the spectrum seen by the human eye. More recently the effect has been pushed to the max, with heavy tone mapping producing an abstract and highly stylised photo effect. The genuine effect is created with various RAW images and processing software, but the Nill Photoalbum has this great tutorial for producing a similar style directly in Photoshop.
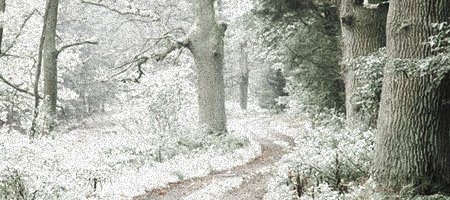
Soft Focus Photography

The effect produced by soft focus photography is actually the result of a flaw in the lens, although lenses with a specific soft focus feature have since been produced. Soft focus lenses create a slightly blurred image that retains sharp edges, often described as a dreamy or glamourous style. Photoshop Talent has this great overview of reproducing the effect.
Movie Photo Effect
Alongside post processing, the video filming of movies often involves a range of camera filters. Ebin has this fantastic tutorial for creating a polished movie-like effect complete with diffusion glow and temperature tweaks in Photoshop.
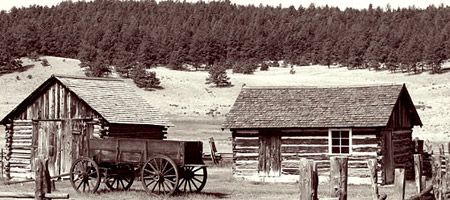
Vintage Photo Effect
With limited technology the early colour photographs often had poor colour reproduction, with shots having an obvious colour casts and inaccurate tones. Today the effect can transform a photograph, instantly sending it back in time to give the impression of an aged effect. Veerle takes us through some techniques for producing a vintage style photo using a few simple Photoshop tweaks.
Tilt Shift Photography
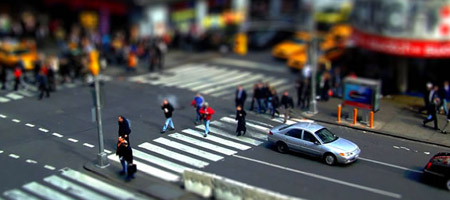
Tilt Shift is a photographic technique where the image plane is rotated, giving a very shallow depth of field but maintaining sharpness in a specific area of the shot. One of the popular post processing effects related to tilt shift photography is known as miniature faking, where the depth of field manually added to a shot gives the illusion of tiny model figures and sceneries. TiltShiftPhotography.net has this fantastic overview of creating the effect yourself.

Thanks for this post, Chris. This is great stuff!
Awsome post! Thank you for the selection!
Outstanding post. One of the best Photoshop round-ups I’ve seen in a long time.
Cracking list there Chris. I’ll try and take a good look at some of those over lunch. Especially interested in the Tilt Shift and Lomo.
Top notch round-up Chris! One of the best sets of tutorials I’ve seen for this subject.
great assortment! That street look one is incredible.
It just goes to show, you can’t be too careful.
Excellent round-up, although I don’t have a camera right now… this has been bookmarked and will come in handy in the future I’m sure.
Just wanted to add that “One of the most recognisable street photography shots is ‘Homeless Mike’ by Leroy Skalstad.” is very similar to art of Andrzej Dragan http://andrzejdragan.com/
His technique was discussed many times online and has been called “Dragan Effect”
Thanks, Awesome Techniques. It’s amazing how better digital graphics are than regular blackroom photos ;).
Wow, I’ve never seen Tilt Shift…that is amazing, looks like miniatures.
oh nice I see some tuts I found montch ago and now I´, happy to have them all on one place (forgot to bookmark ;) )
A great round-up of effects.
All that is needed is a tutorial on how to recreate cross polarization in Photoshop. Any idea anyone?
The marriage of photography and software has always been one of my favorites. Really great stuff here.
A shout out to WillFrancis for the hookup.
There are so many cool styles! Thanks for the post Chris – it makes me want to get my camera out and start snapping.
THANX FOR SHARING! GREAT POST!
Great list of tutorials. Fantastic post Chris. Cheers
Really great Stuff! 70% bookmarked ;)
really great collection – thanks for that Dave Hill photo-effect, I was trying hard to get that effect some time ago!
This is awesome. Thanks bunches!
Thankyou for the comments everyone.
Fabulous source of help.
Thanks for your help !
Wikked mate! Thanks a ton.
Thanks for the list!
I always wanted to do a grunge type photo, I already made some tilt shift effect photo on my website
You could also save yourself the trouble and actually learn how to shoot these on the camera itself! Yeah, that might mean using film. You’ll like it, it’s fun.
This is fantastic, thank you so much for the information and the links!
thanks for sharing such a valuable info.
Regards
Jenney MaC
Thanks for the list!
Could you redesign your titles? I have no idea which title is for which image… :)
this is such a useful list. my gf’s studying PS in her photography course, so it’s perfect as a reference. shot-a-lot!
ciao,
‘enzo
—
http://twitter.com/_enzo
Thanks for this valuable list.
Thanks, this is a great guide. Good links to other sources as well.
The photos are great. i just love how there are so many wonderful options in photo editing. You can create just about anything and so many creative minds have emerged. Thanks, they are great.
Great list of tutorials, thanks! I cant wait to try some of these.
Great post, everybody can use these, good work
Fantastic list, thanks.
Hey Chris,
Happy to have you point people my way. More tutorials coming up in the future. Great blog you have here!
Vincent
aka
mY pEt sKeLeTOn
Interesting post, but you should work harder on layout. It was hard to tell what pictures were meant to go with what effect. It just became a jumbled mess after like 2 or three and I decided to quit reading and make this post.
What a valuable list. I particularly like the Movie Photo Effect, and the Cross Processing. Definitely tweeting about this one.
OOooh, I like that Dave Hill stuff–very eye-catching! Thanks.
I love this post … I’m trying to apply all of them!
Hello,
My name is John Cuyler and I work for Bootcamp Media. I’d be interested in running banner ads on your site or group of sites. Let me know your thoughts.
Thanks, and I hope to hear from you soon,
John
great tutorial list! already tweeted ; thx
Coool…i love this ! great for a amateur photographer like me :)
Great list of tutorials. For someone who is not a good photographer or hasn´t got the right gear to take photos, these kind of techniques are the answer to turn the most normal photo into something worth seeing.
This is great! Thanks.
Please be sure to stop by my blog.
lefilsdalger.blogspot.com
really good quality tutorials on this website!
This is a great resource, however I have a disclaimer, I had to learn how to implement all of them, immediately. And I did so, taking up all of my homework time. so : “Warning:Not for Photoshop Addicts” But then, I suppose that would be for the whole site also.
Great Job :)
I’m enjoying your site!
great selection of tutorials, thanks for sharing! greetings from argentinean :)